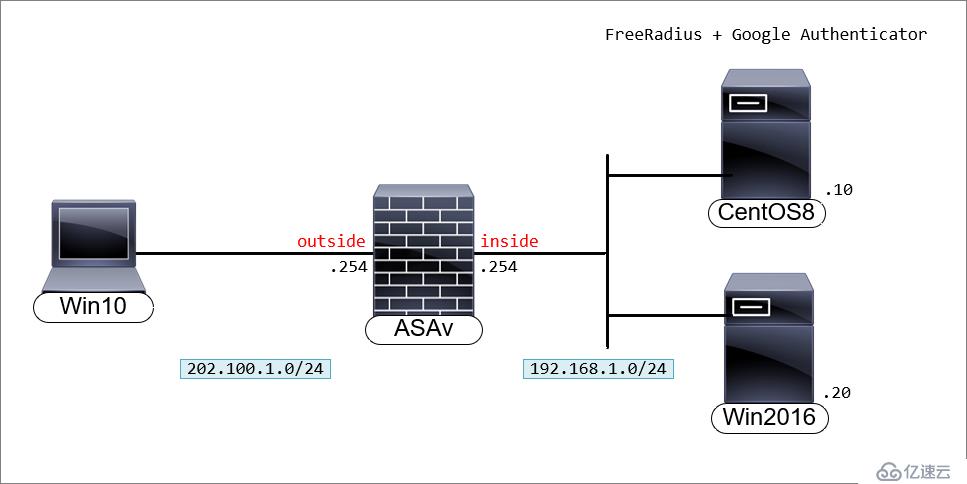
实验目的:用户使用Cisco AnyConnect拨号时,输入AD账号密码和Google动态码后通过认证,获得授权。Cisco ASA指向FreeRADIUS做认证,FreeRADIUS联动AD和google_authenticator。
一、环境介绍拓扑图

实验环境CentOS8有两块网卡,一块网卡用于访问Internet,一块网卡位于防火墙inside区域。
这里使用CentOS8(CentOS7也可以)安装FreeRADIUS和Google Authenticator。Windows Server 2016安装AD服务,AD安装过程这里不做介绍。需要用户在手机上安装Google-Authenticator APP。
用户使用AnyConnect拨号,输入用户名和密码,密码框输入密码+动态码,实现AD账号+动态码双因素认证。
二、CentOS8 环境设置系统更新
[root@centos8 ~]# yum update修改时区
[root@centos8 /]# ln -sf /usr/share/zoneinfo/Asia/Shanghai /etc/localtime查看时间是否正确
[root@centos8 /]#ll /etc/localtime关闭SElinux,临时关闭和永久关闭。
[root@centos8 ~]# setenforce 0 [root@centos8 ~]# sed -i 's/=enforcing/=permissive/g' /etc/selinux/config查看SElinux状态。
[root@centos8 ~]# getenforce Permissive关闭防火墙(可选),本次实验未关闭防火墙。[root@centos8 ~]# systemctl stop firewalld.service [root@centos8 ~]# systemctl disable firewalld.service
三、FreeRADIUS 安装及配置3.1 FreeRADIUS安装安装FreeRADIUS
[root@centos8 ~]# yum install freeradius freeradius-utils启动radius服务
[root@centos8 ~]# systemctl enable --now radiusd.service防火墙放行radius[root@centos8 ~]# firewall-cmd --add-service=radius --permanent [root@centos8 ~]# firewall-cmd --reload
3.2 FreeRADIUS修改配置文件由于FreeRadius必须有权访问所有用户目录中的.google_authenticator令牌,因此它必须具有root权限。
[root@centos8 ~]# vi /etc/raddb/radiusd.conf #user = radiusd #group = radiusd user = root group = root取消pam的注释,radius激活PAM(Pluggable Authentication Modules)可动态加载验证模块。
[root@centos8 ~]# vi /etc/raddb/sites-enabled/default pam激活pam,radius pam模块默认没有激活。
[root@centos8 ~]# ln -s /etc/raddb/mods-available/pam /etc/raddb/mods-enabled/pam编辑/etc/raddb/clients.conf配置文件,接受来Cisco ASAv的radius认证请求。在行末添加防火墙的与共享密钥和ip地址。
[root@centos8 ~]# vi /etc/raddb/clients.conf client 192.168.1.254 { secret = cisco shortname = CiscoASA nastype = cisco }3.3 FreeRADIUS 服务测试新建用户组,如果你需要拒绝用户访问,可以将用户加入到这个组。
[root@centos8 ~]# groupadd radius-disabled编辑/etc/raddb/users将创建的“radius-disabled”组添加到“拒绝用户组”部分。
[root@centos8 ~]# vi /etc/raddb/users #DEFAULT Group == "disabled", Auth-Type := Reject # Reply-Message = "Your account has been disabled." DEFAULT Group == "radius-disabled", Auth-Type := Reject Reply-Message = "Your account has been disabled." DEFAULT Auth-Type := PAMCentOS新建本地账号测试radius服务。
[root@centos8 ~]# useradd radlocal [root@centos8 ~]# passwd radlocal 更改用户 radlocal 的密码 。 新的 密码:radpassword 重新输入新的 密码:radpassword passwd:所有的身份验证令牌已经成功更新。radius 开启调式模式,这个命令非常有用,如果认证不成功,可以根据报错信息定位到错误发生的原因。
[root@centos8 ~]# radiusd -X新建一个窗口,测试本地账号radius验证是否通过,注意Received Access-Accept表示认证通过。
[root@centos8 ~]# radtest radlocal radpassword localhost 18120 testing123 Sent Access-Request Id 9 from 0.0.0.0:41546 to 127.0.0.1:1812 length 78 User-Name = "radlocal" User-Password = "radpassword" NAS-IP-Address = 172.20.29.110 NAS-Port = 18120 Message-Authenticator = 0x00 Cleartext-Password = "radpassword" Received Access-Accept Id 9 from 127.0.0.1:1812 to 127.0.0.1:41546 length 20开启radius -X窗口显示的输出作为参考。
Listening on auth address 127.0.0.1 port 18120 bound to server inner-tunnel Listening on proxy address * port 43164 Listening on proxy address :: port 40551 Ready to process requests (0) Received Access-Request Id 9 from 127.0.0.1:41546 to 127.0.0.1:1812 length 78 (0) User-Name = "radlocal" (0) User-Password = "radpassword" (0) NAS-IP-Address = 172.20.29.110 (0) NAS-Port = 18120 (0) Message-Authenticator = 0xeba37c10c860860bd3dcc7bff2c5edf0 (0) # Executing section authorize from file /etc/raddb/sites-enabled/default (0) authorize { (0) policy filter_username { (0) if (&User-Name) { (0) if (&User-Name) -> TRUE (0) if (&User-Name) { (0) if (&User-Name =~ / /) { (0) if (&User-Name =~ / /) -> FALSE (0) if (&User-Name =~ /@[^@]*@/ ) { (0) if (&User-Name =~ /@[^@]*@/ ) -> FALSE (0) if (&User-Name =~ /\.\./ ) { (0) if (&User-Name =~ /\.\./ ) -> FALSE (0) if ((&User-Name =~ /@/) && (&User-Name !~ /@(.+)\.(.+)$/)) { (0) if ((&User-Name =~ /@/) && (&User-Name !~ /@(.+)\.(.+)$/)) -> FALSE (0) if (&User-Name =~ /\.$/) { (0) if (&User-Name =~ /\.$/) -> FALSE (0) if (&User-Name =~ /@\./) { (0) if (&User-Name =~ /@\./) -> FALSE (0) } # if (&User-Name) = notfound (0) } # policy filter_username = notfound (0) [preprocess] = ok (0) [chap] = noop (0) [mschap] = noop (0) [digest] = noop (0) suffix: Checking for suffix after "@" (0) suffix: No '@' in User-Name = "radlocal", looking up realm NULL (0) suffix: No such realm "NULL" (0) [suffix] = noop (0) eap: No EAP-Message, not doing EAP (0) [eap] = noop (0) files: users: Matched entry DEFAULT at line 69 (0) [files] = ok (0) [expiration] = noop (0) [logintime] = noop (0) pap: WARNING: No "known good" password found for the user. Not setting Auth-Type (0) pap: WARNING: Authentication will fail unless a "known good" password is available (0) [pap] = noop (0) } # authorize = ok (0) Found Auth-Type = pam (0) # Executing group from file /etc/raddb/sites-enabled/default (0) authenticate { (0) pam: Using pamauth string "radiusd" for pam.conf lookup (0) pam: Authentication succeeded (0) [pam] = ok (0) } # authenticate = ok (0) # Executing section post-auth from file /etc/raddb/sites-enabled/default (0) post-auth { (0) update { (0) No attributes updated (0) } # update = noop (0) [exec] = noop (0) policy remove_reply_message_if_eap { (0) if (&reply:EAP-Message && &reply:Reply-Message) { (0) if (&reply:EAP-Message && &reply:Reply-Message) -> FALSE (0) else { (0) [noop] = noop (0) } # else = noop (0) } # policy remove_reply_message_if_eap = noop (0) } # post-auth = noop (0) Sent Access-Accept Id 9 from 127.0.0.1:1812 to 127.0.0.1:41546 length 0 (0) Finished request Waking up in 4.9 seconds. (0) Cleaning up request packet ID 9 with +50 Ready to process requests四、SSSD安装配置郑重声明:本文版权归原作者所有,转载文章仅为传播更多信息之目的,如作者信息标记有误,请第一时间联系我们修改或删除,多谢。


